Starting Cool-Season Radishes in Recycled Plastic Food Containers
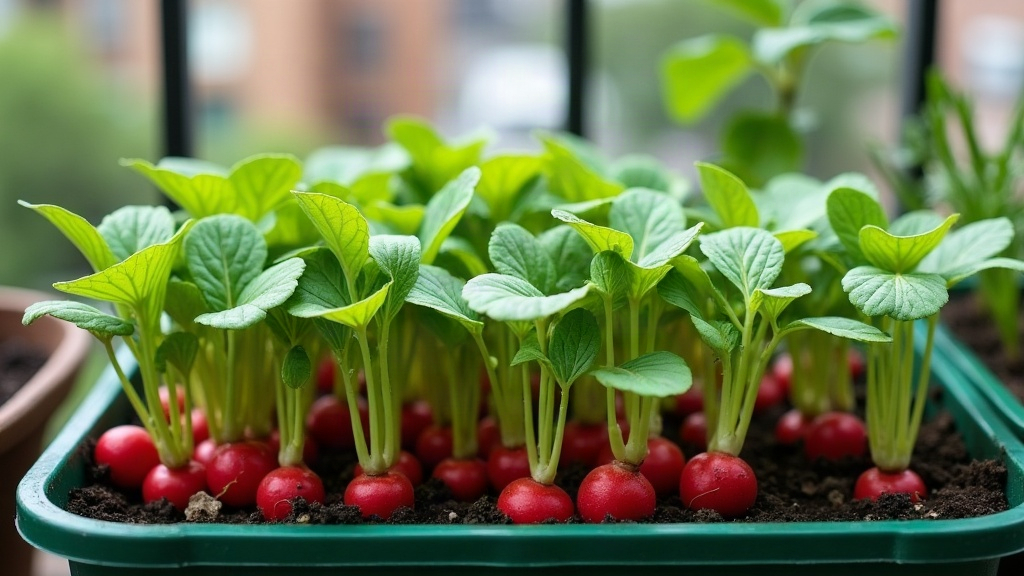
Radishes might be the single most forgiving vegetable you can throw into the ground (or, in this case, an old yogurt tub). Cool-season varieties do particularly well when planted in repurposed plastic food containers, the kind that usually go straight into the recycling bin: yogurt tubs, takeout boxes, deli cups. Give them a few drainage holes, a couple inches of soil, and the crisp temperatures of autumn or spring, and you’ll be pulling fresh radishes out in 21 to 30 days. No new pots required.
Why Recycled Containers Work So Well for Radishes
Radishes have shallow, compact roots. That’s the whole secret here. They don’t need deep soil or elaborate raised beds, just enough room for a small root ball to swell, which makes them perfect for whatever plastic containers happen to be piling up in your recycling bin already.
- Yogurt tubs and cottage cheese containers (16 to 32 oz) hold enough soil for 3 to 5 plants at a time.
- Clamshell takeout containers double as mini greenhouses if you leave the lid on during germination. The condensation actually helps.
- Aluminum foil trays and deli cups are great for succession planting, small batches every week or two so you’re not flooded with radishes all at once.
- Milk jugs cut in half give you the extra depth needed for larger daikon-type radishes.
Reusing containers costs nothing, keeps plastic out of the landfill a little longer, and honestly makes gardening more fun. Instead of committing to one big bed, you end up with five or six little experiments scattered across a windowsill.
Preparing Your Containers
Before anything goes in the soil, every container needs a bit of prep work:
- Drill or poke drainage holes. A heated nail, a drill bit, even a box cutter will do. Aim for 4 to 6 holes in the bottom. Skip this step and you’ll end up with mushy, rotted roots within a week.
- Clean thoroughly. Warm water and dish soap, nothing fancy. Leftover food residue attracts pests and mold faster than you’d think.
- Check the depth. You want at least 4 to 6 inches of soil. Round types like ‘Cherry Belle’ are fine with less; longer varieties like ‘French Breakfast’ want a bit more room to stretch.
- Add a saucer or tray underneath to catch runoff, especially important if your containers are sitting on a windowsill or balcony railing.
Choosing the Right Cool-Season Radish Variety
Not every radish acts the same in a cramped container. If you’re new to this, stick with fast, round varieties, they’re the most forgiving by far.
- Cherry Belle – ready in 22 to 24 days, the classic round red radish everyone pictures
- French Breakfast – elongated shape, milder bite, matures in 25 to 30 days
- Easter Egg Blend – a mix of purple, white, and pink roots, nice if you want some color variety
- White Icicle – slim, crisp, with a bit more heat than the others
Cool-season radishes are happiest with daytime temps between 50 and 65°F (10 to 18°C). That basically points you to early spring or early autumn as your planting windows.
Planting Step-by-Step
- Fill containers with a light, well-draining potting mix. Regular garden soil compacts too much in small spaces, don’t use it.
- Sow seeds about ½ inch deep, spaced roughly 1 inch apart. For a 16 oz yogurt tub, 4 to 5 seeds is plenty, don’t overdo it.
- Water gently right after planting. A spray bottle or a fine-mist watering can keeps seeds from getting washed around or buried too deep.
- Find a sunny spot, at least 4 to 6 hours of direct light a day. A bright windowsill or a covered porch works fine once temperatures drop.
- Thin seedlings once they hit about an inch tall. Leave the strongest one every 2 inches; crowding them just leads to stunted, undersized roots.
Ongoing Care
- Water consistently. Radishes want evenly moist soil. Let it dry out and rehydrate unevenly, and you’ll get cracked, woody roots that aren’t worth eating.
- Watch the temperature. A random warm spell can trigger bolting fast. If that happens, shift containers somewhere shadier for a few days.
- Go easy on fertilizer. Too much nitrogen gives you gorgeous green tops and disappointing little roots underneath. A light, balanced feed at planting time is really all you need.
- Keep an eye out for pests. Flea beetles are the usual culprit. A sheet of fine mesh over the container keeps most of them off.
Harvesting
Give it 3 to 4 weeks and most cool-season radishes are ready. Not sure? Push the soil aside gently and peek at the shoulder of the root, once it’s 1 to 1.5 inches across, it’s time to pull. Leave them too long and they turn pithy and unpleasantly hot, not exactly what you were hoping for.
Conclusion
Growing cool-season radishes in old plastic food containers is about as low-cost and low-effort as vegetable gardening gets. Good drainage, the right variety, steady watering, and a cool spot with decent sunlight, that’s the whole formula. Within a month you’ll be pulling crisp, homegrown radishes right off your windowsill or patio, and proving to yourself that small-space, budget gardening can actually work.